Antique Frames in a Modern Home (Brooched Edition): How to Style
1) Introduction
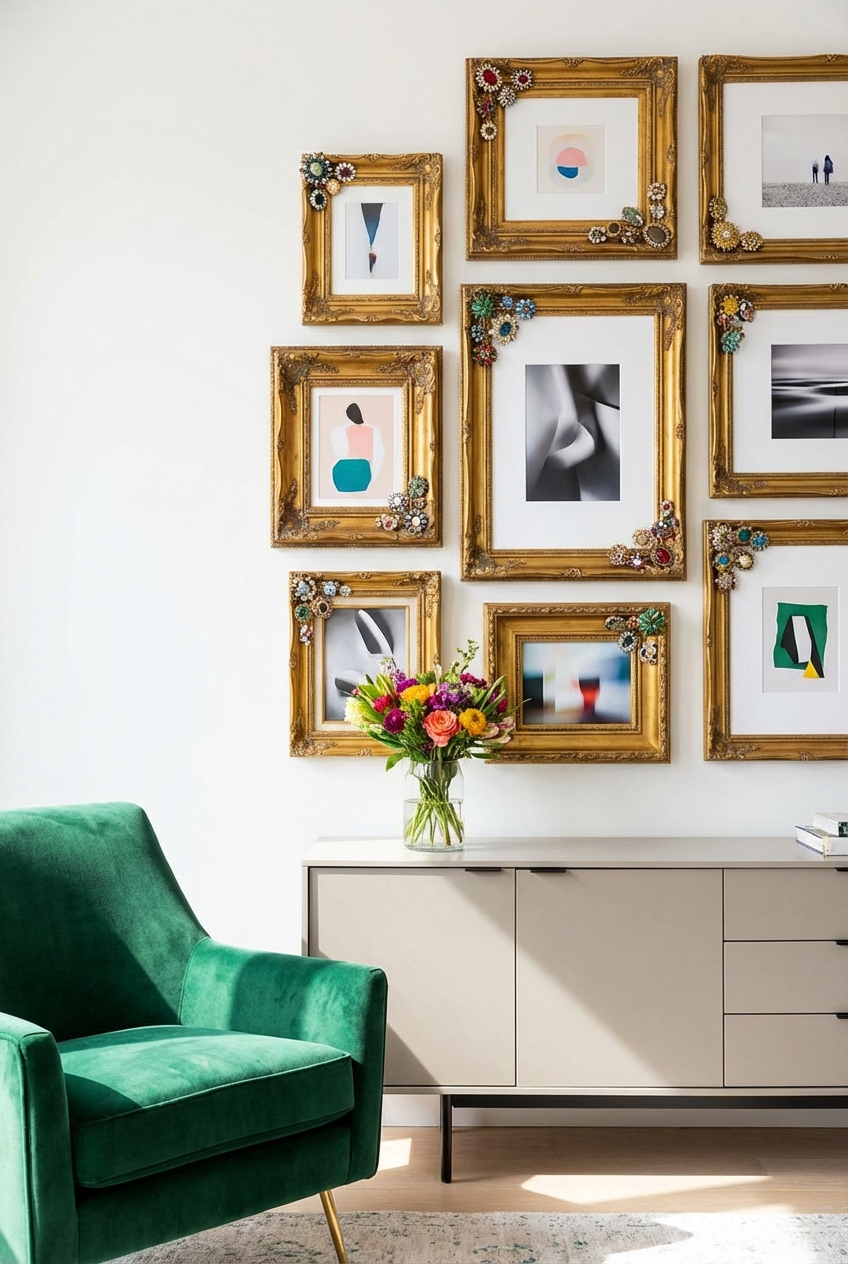
There is a distinct tension that happens when you place a heavy, ornate, 19th-century gilded frame against a crisp, stark white wall. It creates a vibration in the room. It stops feeling like a showroom and starts feeling like a home with a history.
I remember my first “real” design project where the client had sleek, Italian leather furniture but inherited a box of crumbling, Victorian-era frames. Instead of hiding them, we leaned into the clash. We cleaned them up, floated modern abstract sketches inside, and hung them with exposed brass chains. That juxtaposition is what we call the “Brooched” look—treating wall decor like heavy, intricate jewelry on a simple black dress.
This style isn’t just about hanging old pictures. It is about texture, patina, and the mechanics of hanging art. If you want visual inspiration to guide you, please scroll down to verify the Picture Gallery at the end of the blog post.
2) At-a-Glance: Key Takeaways
- Contrast is King: The Brooched look relies on the friction between chipped, gold-leaf antiques and smooth, modern drywall or plaster.
- Visible Mechanics: Unlike standard gallery walls, this style often exposes the hanging hardware—think velvet ribbons, brass chains, or decorative rosettes.
- Float Mounting: To modernize an antique frame, float the artwork in the center with exposed backing rather than cutting a traditional mat that touches the edges.
- Safety First: Antique frames are often heavier than modern ones. You cannot rely on a single nail; wall anchors and proper D-rings are non-negotiable.
- The “Jewelry” Ratio: Treat these frames as accents. Too many can make a room look like an antique shop. Use them sparingly for maximum impact.
3) What This Style/Idea Means (and Who It’s For)
The “Brooched Edition” of styling antique frames refers to the concept of wall jewelry. When you pin a vintage brooch onto a modern blazer, you are adding a singular, high-contrast focal point. We apply that same logic to interiors.
This style creates a specific aesthetic that values the frame as much as—or sometimes more than—the art inside it. It celebrates the imperfections, the peeling gesso, and the darkened gold leaf.
This approach is perfect for:
- Renters: You can create massive visual interest without painting walls or changing light fixtures.
- Collectors: If you love estate sales but live in a new-build apartment, this bridges the gap between your architecture and your taste.
- Minimalists: Surprisingly, a single, large-scale antique frame in an empty room creates a stronger minimalist statement than a gallery wall of matching black frames.
4) The Signature Look: Ingredients That Make It Work
To execute this correctly, you need to curate your materials. You are looking for specific textures that offset modern furniture.
The Frame Condition
You generally want “shabby chic” but structurally sound. Look for frames with intricate corner details. A little chipping on the finish is desirable; it proves age. However, the corners must be tight. If the wood is separating, it is a safety hazard.
The Hardware (The “Brooch” Element)
This is what sets this edition apart. We aren’t hiding the wire behind the frame. We are using:
- Thick velvet or grosgrain ribbon (typically 1 to 2 inches wide).
- Decorative picture rail hooks (even if you don’t have picture rails, you can install molding hooks).
- Brass chains or decorative rosettes that mount to the wall.
The Content
To keep it modern, avoid putting traditional oil portraits inside these frames unless you are going for a very specific maximalist look. Instead, opt for high-contrast modern photography, abstract line drawings, or even an antique mirror with desilvering (black spots).
5) Layout & Proportions (Designer Rules of Thumb)
This is where DIY projects often fail. The placement of antique frames requires different math than lightweight modern frames because they have more visual “weight.”
The 57-Inch Rule (With a Twist)
The standard museum rule is to hang art so the center of the piece is 57 to 60 inches from the floor. For Brooched antique frames, I often lower this to 55 or 56 inches if the frame is exceptionally heavy or thick. This grounds the piece and makes it feel more intimate.
Spacing for Clusters
If you are grouping these frames, do not use the standard 2-inch gallery wall spacing. Because the frames are ornate, they need “breathing room.”
- Minimum spacing: 3 to 4 inches between frames.
- Maximum spacing: 6 inches. Any more and they feel disconnected.
Furniture Relationships
When hanging above a sofa or console:
- The bottom of the frame (or the bottom of the hanging ribbon) should be 6 to 8 inches above the top of the furniture.
- The total width of the art arrangement should span roughly two-thirds the width of the furniture piece below it.
Designer’s Note: The “Heavy Bottom” Rule
If you are mixing frame styles, always place the thickest, darkest, or heaviest-looking frames at the bottom of your arrangement. If you put a heavy gold frame above a thin metal frame, the layout will feel top-heavy and anxious.
6) Step-by-Step: How to Recreate This Look
Follow this process to get the installation right the first time.
Step 1: Prep the Frame
Flip the frame over. Remove any old, rusting screw eyes or brittle wire. These are failure points. Clean the front with a soft, dry brush. Do not use water or chemical sprays on gold leaf; it can dissolve the clay (bole) underneath.
Step 2: Secure the Glass
Antique frames often have loose glass. If you are reusing the old glass (which has beautiful waviness), clean it carefully. Secure it using a glazier’s point driver or small brad nails gently tapped into the side of the rabbet.
Step 3: Install New Hardware
Install heavy-duty D-rings on the back, about one-third of the way down from the top.
For the Brooched look: If you are using ribbon to hang it, attach the ribbon securely to the D-rings. Ensure the ribbon is tied or stitched so it cannot slip.
Step 4: The Anchor Point
Install your wall hardware. If using a decorative rosette or knob, locate a stud. Antique frames can weigh 20+ pounds. If you cannot find a stud, use a toggle bolt (snaptoggle), which provides the highest hold for drywall.
Step 5: The “Tilt” Adjustment
Antique frames often tilt forward away from the wall due to the placement of the D-rings. To fix this, stick felt bumper pads on the bottom two corners of the frame. You can double them up if needed to make the frame hang parallel to the wall.
7) Budget Breakdown: Low / Mid / Splurge
You can achieve this look at any price point, but the longevity of the materials will vary.
Low Budget ($50 – $150)
- Source: Goodwill, estate sale leftovers, or “as-is” bins at antique malls.
- Glass: Standard hardware store glass or acrylic.
- Hanging: DIY velvet ribbon from a fabric store; standard nails.
- Art: Printable digital downloads or pressed botanicals.
Mid Budget ($250 – $600)
- Source: Curated vintage shops or Etsy sellers who have already cleaned the frames.
- Glass: UV-protective non-glare glass (worth it to protect the art).
- Hanging: Brass picture rail hooks and high-quality silk ribbons.
- Art: Original sketches or limited edition prints.
Splurge ($1,000+)
- Source: 19th-century French or Italian gilt wood frames from a dealer.
- Glass: Museum Glass (virtually invisible and UV blocking).
- Hanging: Custom-cast bronze rosettes or antique architectural hardware.
- Art: Commissioned oil paintings or high-value vintage photography.
8) Common Mistakes (and How to Fix Them)
Mistake 1: “Floating” too High
People tend to hang art too high, especially when using ribbons. They measure the height of the hook, not where the frame will land.
The Fix: Measure the distance from the hook to the top of the frame before you drill. Hold the frame up by the ribbon to see exactly where the gravity settles it.
Mistake 2: Overcrowding
Putting too many ornate frames on one wall makes a room look like a cluttered grandmother’s attic rather than a curated gallery.
The Fix: Use the “Power of One.” Try one massive antique frame on a wall instead of six small ones. The negative space around it is what makes it modern.
Mistake 3: Mismatched Undertones
Gold is not just gold. Some antique frames are greenish-bronze, some are bright yellow-gold, and some are reddish-copper.
The Fix: Group frames by undertone. Keep the cool bronzes together and the warm coppers together. If you must mix, ensure they are separated by a neutral element (like a mirror or a black frame).
9) Room-by-Room Variations
The Entryway
This is the best place for a “Brooched” mirror. Find a small, very ornate oval frame. Replace the art with a mirror. Hang it with a thick, jewel-tone velvet ribbon (emerald or navy) on a hook. It acts as a statement piece immediately upon entering.
The Kitchen
Kitchens are full of hard surfaces (stone, steel, tile). A small, wooden antique frame leaning on the countertop or hung on the backsplash adds necessary warmth.
Designer Tip: Do not put valuable art here due to grease and steam. Frame a vintage recipe card or a simple botanical print.
The Bathroom
Proceed with caution. The humidity will destroy gesso (the white plaster-like layer under the gold) over time.
The Fix: Use solid wood frames that are painted or stained, rather than gilded plaster. Ensure the back of the frame is sealed with framing tape to keep moisture out.
The Living Room
This is where you play with scale. If you have a modern, low-profile sofa, hang a large landscape-oriented antique frame above it. Because modern sofas are low, you can hang the art lower, creating a cozy vignette.
10) Finish & Styling Checklist
Before you call the project done, run through this list to ensure the look is polished.
- Lighting: Does the frame cast a shadow on the art? If the frame is very deep, you may need a picture light mounted above it to illuminate the image.
- Level Check: Antique frames are rarely perfectly square. Place your level on the art inside or the mat board, not the top of the wonky frame.
- Ribbon Tail: If using a ribbon, trim the ends at a 45-degree angle or a “V” shape to prevent fraying. A dab of clear nail polish on the cut edge stops unraveling.
- Anchor Test: Gently pull on the frame. If the wall anchor moves, take it down immediately and reinstall with a toggle bolt.
11) FAQs
Can I paint an antique frame?
If the frame is made of plastic or resin reproduction, yes. If it is genuine 100-year-old gilt wood, I highly recommend against it. You destroy the value and the patina. If you hate the gold, look for a different frame rather than ruining an antique.
What if the frame is empty?
Empty frames are a look, but they are tricky. To avoid it looking like you just moved in, layer them. Lean a small empty frame inside a larger empty frame on a mantel. This creates depth and shadow play.
How do I mix metals?
It is perfectly fine to have a gold antique frame in a room with silver or matte black lamps. The antique gold acts as a neutral. However, try to repeat the gold tone one other place in the room, perhaps in a small bowl or a candlestick, to tie it together.
12) Conclusion
Styling antique frames in a modern home is an exercise in confidence. You are deliberately choosing to display something worn, imperfect, and heavy in a space that values clean lines and newness. That contrast is the “Brooched” aesthetic.
By paying attention to the mechanics—the ribbons, the hooks, and the spacing—you elevate a dusty garage sale find into a piece of architectural jewelry. It stops being just a frame and becomes a pivotal design element that grounds your modern life in a little bit of history.
13) Picture Gallery


