Capsule Wardrobe For Outdoor Adventures
There is a pervasive myth in the fashion world that you must sacrifice style for utility the moment you step off the pavement and onto a trail. I learned this lesson the hard way during a trip to the Swiss Alps early in my career. I packed beautiful, structurally impressive coats that were heavy, absorbent, and utterly useless against a sudden altitude drop and freezing rain.
That trip taught me that true luxury in the outdoors is defined by performance, not just aesthetics. However, that does not mean you have to resign yourself to shapeless, oversized gear that makes you feel unpolished. By applying the principles of a capsule wardrobe—curation, versatility, and color cohesion—you can build an adventure kit that functions technically while maintaining a sophisticated silhouette.
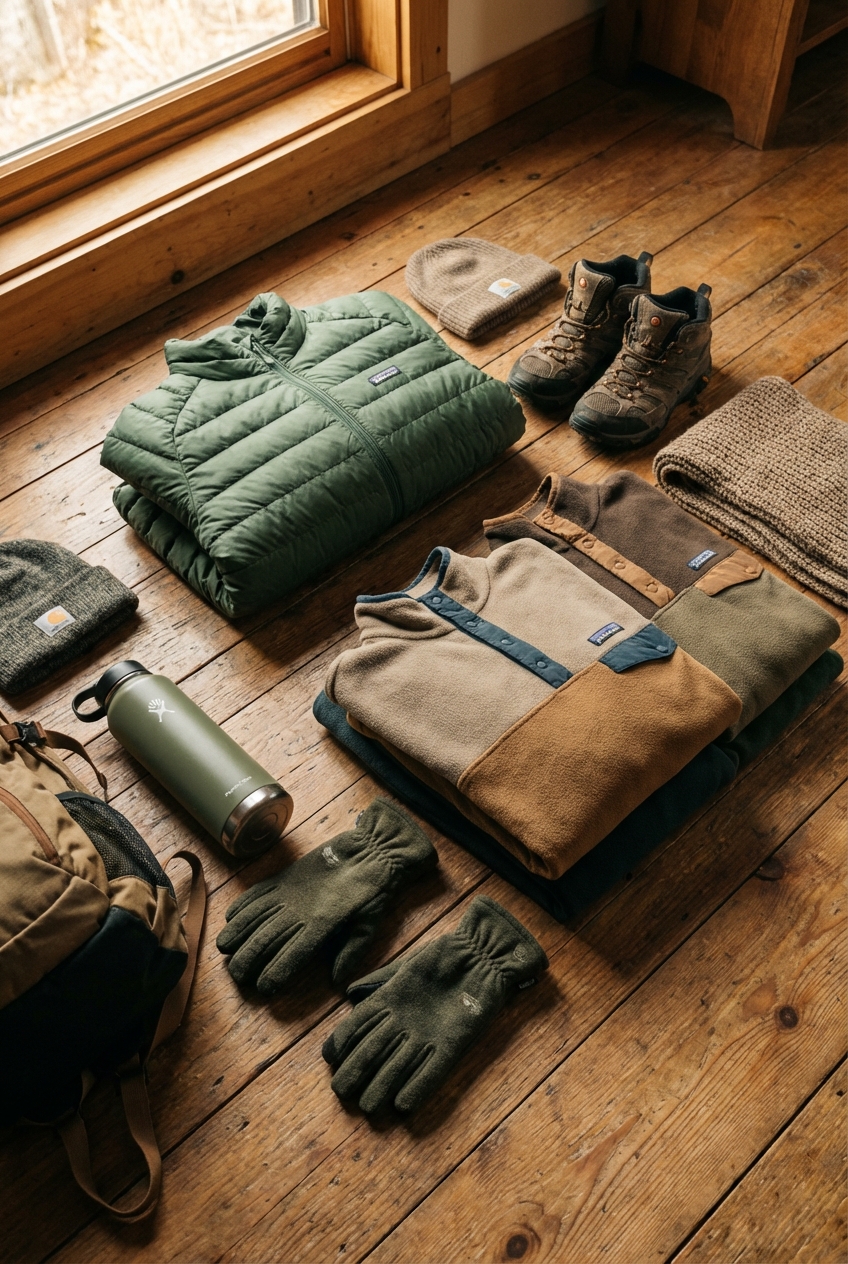
This guide is designed to help you curate a high-end outdoor capsule that fits in a carry-on, keeps you safe in the elements, and looks chic enough for an après-hike dinner in town. For visual inspiration on how to layer these pieces effectively, be sure to check out the Picture Gallery at the end of the blog post.
1. The Foundation: Understanding Fabric Technology
The most critical rule in outdoor fashion is that “cotton kills.” Cotton absorbs moisture and holds it against your skin, which pulls heat away from your body. In a capsule wardrobe, every single item must actively work to regulate your temperature.
Your base layer is your second skin. For a high-end approach, Merino wool is the gold standard. Unlike synthetic polyester, Merino is natural, antimicrobial (meaning it resists odors even after days of wear), and temperature-regulating. It keeps you cool when it is hot and warm when it is cold.
When selecting a base layer top, look for a “150 to 200 GSM” weight. GSM stands for grams per square meter; this range is light enough for layering without being sheer. Fit is paramount here. The shirt should skim your body closely without restricting movement, allowing moisture to wick efficiently.
2. The Mid-Layer: Insulation Without the Bulk
The mid-layer is where many people lose their silhouette. The goal here is trapping heat. Traditionally, this meant a bulky, oversized fleece that bunched up under a jacket. Today, we look for “micro-grid” fleece or high-fill down alternatives.
For a streamlined look, I recommend a thin, down or synthetic sweater. Look for “800-fill power” or higher. This number indicates the quality of the down; higher numbers mean better warmth-to-weight ratio, allowing the jacket to be incredibly thin yet warm.
Stylist’s Note:
One lesson I often share with clients is to pay attention to the baffles—the stitched compartments that hold the down. Narrower, patterned baffles tend to be more slimming than large, horizontal puffer rolls. If you are petite, avoid long, tunic-length mid-layers; they will shorten your legs. Opt for a crop that hits at the hip bone.
3. The Outer Shell: Your Shield Against Elements
The outer shell is the most technical piece in your capsule. Its sole job is to block wind and rain while allowing sweat vapor to escape. If you buy a cheap raincoat that isn’t breathable, you will get wet from the inside out due to sweat condensation.
Look for a “3-layer” construction featuring a waterproof-breathable membrane. In terms of sizing, this is where measurements matter. You need enough room to fit your base layer and mid-layer underneath without compressing the down (which reduces warmth), but not so much room that the jacket billows in the wind.
Prioritize jackets with “pit zips” (ventilation zippers under the arms) and an adjustable hood. A good hood should have a cinch cord at the back of the head. This keeps the brim from falling over your eyes and ruining your peripheral vision—a safety hazard on uneven terrain.
4. Bottoms: The Balance of Durability and Stretch
Hiking pants have undergone a massive rebrand in the last five years. You no longer need to wear baggy cargo pants with zip-off knees that create an unflattering break in the leg line. The modern outdoor capsule relies on technical trekking tights or softshell trousers.
If you prefer leggings, ensure they are specifically designed for hiking. Yoga pants are too thin and will snag on branches or rocks. Look for reinforced panels on the knees and seat. These materials should be abrasion-resistant.
For trousers, seek out a “four-way stretch” woven fabric with a DWR (Durable Water Repellent) finish. I always look for a gusseted crotch. This is a diamond-shaped piece of fabric sewn into the inseam that prevents the pants from riding up or pinching when you are climbing steep inclines.
5. Footwear: Anchoring the Look
Your shoes dictate what you can do and how long you can do it. For a capsule approach, we want a boot that bridges the gap between technical hiker and urban walker. Bulky, heavy mountaineering boots are overkill for most standard adventures and are a pain to pack.
Leather hiking boots with red laces offer a classic “heritage” look that pairs perfectly with jeans for dinner. However, they require a break-in period. If your trip is next week, do not buy leather.
For immediate comfort, look for trail runners or light hikers with Vibram soles. The “drop” of the shoe—the height difference between the heel and toe—matters. A standard drop is 8mm to 10mm. If you aren’t used to “zero drop” shoes, do not bring them on a trip, as they can strain your Achilles tendons.
6. Accessories: High-Fashion Utility
Accessories in an outdoor capsule serve vital safety functions but are also your best opportunity to introduce personality and color. A monochromatic outfit in olive or charcoal looks instantly chic with a saffron yellow beanie or a patterned neck gaiter.
What I’d do in a real project (The Pack List):
- Socks: 3 pairs of Merino wool hiking socks. (Never cotton). Look for “light cushion” for warm weather and “full cushion” for cold.
- Eyewear: Polarized sunglasses are non-negotiable. They cut glare from water and snow, reducing eye strain.
- Headwear: A wide-brimmed felt or technical hat for sun, and a Merino beanie for sleeping or cold mornings.
- The “Buff”: A tube scarf. It functions as a scarf, headband, balaclava, or even a towel in a pinch.
Common Mistakes + Fixes
Mistake: Overpacking “Just in Case” Items
It is tempting to pack five different shirts for a weekend trip. This adds weight and decision fatigue.
The Fix: Trust the antimicrobial properties of Merino wool. You can wear one shirt for three days, hang it up to air out at night, and it will be fresh. Pack two tops total: one to wear, one to wash/dry.
Mistake: Ignoring Color Theory
Buying gear on sale often results in a mismatch of neon oranges, electric blues, and patterned purples that don’t go together.
The Fix: Stick to a strict palette. I prefer “Earth + One.” Choose earth tones (sage, slate, sand, black) for your expensive outer layers and pants. Choose one accent color for your mid-layers and accessories. This ensures every item matches every other item.
Mistake: Improper Sock Fit
Wearing socks that are too loose causes bunching, which leads to blisters immediately.
The Fix: Hiking socks should fit snugly without restricting circulation. The heel cup of the sock should sit perfectly on your heel. If it rides up the ankle, the sock is too big.
Finish & Styling Checklist
Before you zip your suitcase or backpack, run through this stylist’s checklist to ensure functionality meets fashion.
- The Squat Test: Put on your full outfit (pants and base layer) and do a deep squat. Does the waistband gap in the back? Do the knees pinch? If yes, the fit is wrong.
- The Arm Lift: Put on your jacket and lift your arms straight up. Does the hem expose your stomach? If so, you will be cold and exposed on the trail. You need a longer cut.
- The Rub Test: Put on your backpack with your intended shirt. Are there seams on the shirt sitting directly under the shoulder straps? This will cause chafing. Seamless shoulders are best.
- Color Cohesion: Lay all items on the bed. Is there a cohesive color story? If you took a photo of the pile, would it look curated?
- Texture Mix: Do you have a mix of textures? Matte pants, slightly sheen jacket, knit beanie. This adds visual depth to the outfit.
FAQs
How do I clean my technical gear during a trip?
For a capsule wardrobe, you may need to hand wash. Bring a small packet of wool-safe detergent. Wash the item in a sink or dry bag, rinse well, and roll it in a towel to squeeze out excess water. Never wring out wool; it stretches the fibers. Hang to dry.
Can I wear leggings as pants?
Yes, but thickness matters. Look for “winter weight” or brushed-interior leggings if the temperature will be below 50°F. Ensure they are fully opaque. Pair them with slightly longer socks (crew height) scrunched down for a balanced look.
Is expensive gear really worth it?
In the outdoors, generally, yes. You are paying for warmth-to-weight ratio and durability. A $300 shell will last you 10 years and keep you truly dry, whereas a $50 rain jacket often acts like a plastic bag, trapping sweat and wetting you from the inside.
How should my hiking boots fit compared to heels?
You generally need to size up 0.5 to a full size from your street shoes. Your feet will swell during a hike. You should be able to wiggle your toes freely. If your toes touch the front of the boot when you are walking downhill, they are too small and you will lose toenails.
Conclusion
Building a capsule wardrobe for outdoor adventures is an exercise in restraint and respect for materials. It is about removing the excess until you are left with pieces that serve you flawlessly. When you trust your gear, you stop thinking about being cold, wet, or uncomfortable.
Instead, you can focus entirely on the experience—the crunch of the trail beneath your boots, the changing light on the horizon, and the joy of movement. You do not have to choose between looking like a fashion expert and being a capable adventurer. With the right technical fabrics and a focus on fit, you can be both.
Picture Gallery


