How To Layer Necklaces For A Flawless Look
There is a moment during every fitting when an outfit shifts from “good” to “editorial.” It rarely happens when we zip up the dress or button the blouse. It almost always happens when we start adding the hardware. Layering necklaces is the secret weapon of every stylist; it is the easiest way to make a simple white t-shirt look expensive or a slip dress feel red-carpet ready.
However, getting that effortless, cascading look is surprisingly technical. I have seen clients struggle with chains that constantly tangle, pendants that clump together, or combinations that look messy rather than curated. The goal is to create texture and interest without looking like you just raided a jewelry box in the dark.
In this guide, I am breaking down the exact formulas I use on set to create perfectly spaced stacks. We will cover spacing measurements, mixing metals, and the crucial role your neckline plays in the arrangement. If you are looking for visual inspiration, check out the Picture Gallery at the end of the blog post for my favorite stacking combinations.
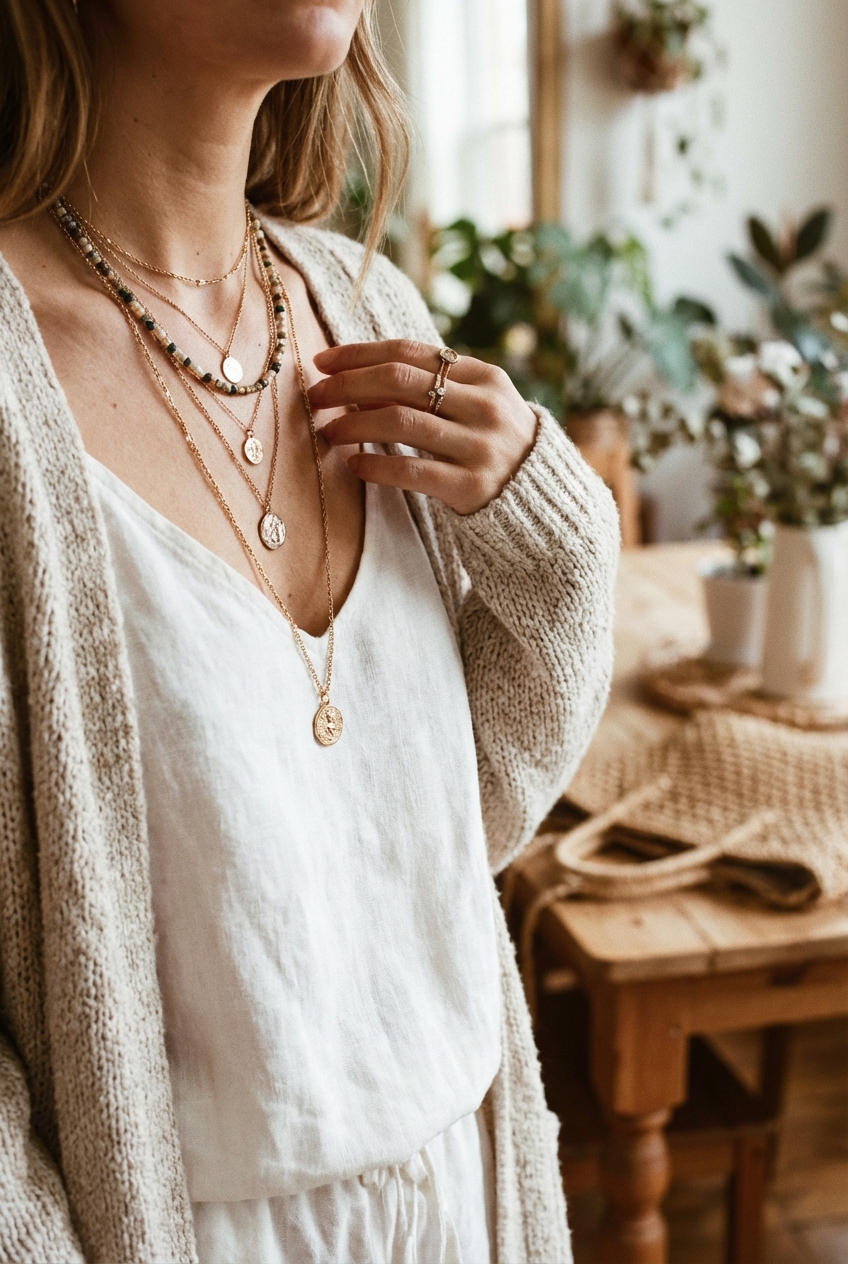
1. The Mathematics of Length and Spacing
The biggest mistake people make is buying necklaces that are all roughly the same length. When you do this, the chains compete for the same real estate on your chest, leading to a cluttered mess. To get that distinct, layered look, you need to master the spacing.
I operate by the “Two-Inch Rule.” Generally, you want at least two inches of difference between each chain in your stack. This ensures each piece has its own visual lane and catches the light independently. It also drastically reduces the friction that leads to knotting.
Here are the standard measurements I keep in my styling kit:
- 14–15 inches (Choker/Collar): This sits high on the neck or right at the collarbone. It acts as the anchor for the entire stack.
- 16–18 inches (Princess): This is the most common length. It sits nicely below the collarbone and is usually the “middle” layer.
- 20–24 inches (Matinee): This length falls toward the bust line and is ideal for heavier pendants or lockets.
Designer’s Note: Always keep a few distinct necklace extenders in your jewelry box. Even high-end chains often come with fixed clasps. An inexpensive 2-inch extender allows you to manually adjust a 16-inch chain to an 18-inch length, giving you the flexibility to make any two necklaces work together.
2. Establishing the Hierarchy: The Base, The Bridge, and The Pendant
A great necklace stack tells a story, and every story needs a structure. I like to build stacks using a three-part hierarchy. This prevents the look from becoming overwhelming and ensures there is a clear focal point.
The Base Layer
This is your shortest chain. I almost always choose something with texture but no pendant for this layer. Think of it as the foundation. Thick herringbone chains, tennis necklaces, or structured collars work beautifully here. They draw the eye up toward the face and provide a solid line that contrasts with the drapes below.
The Bridge Layer
This is the connector. It should sit about two inches below your base. This is a great spot for a delicate chain with a small integrated charm, or a slightly texture-heavy chain like a paperclip or rope style. It bridges the gap between the structured choker and the heavy pendant.
The Pendant Layer
This is the anchor at the bottom, usually on the longest chain (20 to 24 inches). Gravity is your friend here. A heavier pendant creates a “V” shape that elongates the neck and torso. Without a heavy weight at the bottom, your longest chain tends to float around and look aimless.
Common Mistakes + Fixes:
- Mistake: Using three pendants of the same size.
- Fix: Vary the scale. If your top layer has a tiny diamond solitaire, your bottom layer should have a substantial coin or medallion. The eye should travel down to the heaviest point.
3. Mixing Textures and Chain Styles
If you wear three delicate cable chains, they will disappear into one another. The secret to that rich, curated look you see in magazines is texture contrast. You want the light to hit each strand differently.
I recommend mixing at least two distinct chain styles in a three-necklace stack. If your base is a flat, reflective snake chain (which catches light like a mirror), your next layer should be something faceted or open, like a Figaro or a box chain.
Here are a few texture combinations that always work:
- The Classic Trio: A pearl choker (organic texture), a gold snake chain (liquid metal texture), and a coin pendant on a cable chain.
- The Modernist: A diamond tennis necklace (sparkle), a heavy paperclip chain (architectural), and a stone pendant.
- The Bohemian: A beaded necklace, a rope chain, and a locket.
When selecting chains, also consider flexibility. Stiff chains like herringbones or omegas sit flat against the skin and don’t tangle easily. Fluid chains like box or cable styles move with you. A mix of rigid and fluid chains helps keep the layers separated.
4. The Art of Mixing Metals
For years, the old-school fashion rule was strict: wear silver with silver and gold with gold. That rule is dead. Mixing metals is not only acceptable; it is the hallmark of a modern, sophisticated collection. It shows you are curating pieces you love rather than buying a matching set.
However, there is a right way to do it. You cannot simply throw on one silver chain and one gold chain and hope for the best. You need a “unifying piece.”
What I’d do in a real project:
If I am styling a client who wants to mix metals, I look for a piece that inherently contains both. This might be a watch with a two-tone band, or specifically a necklace that features mixed links. Once you have that bridge piece in the stack, you are free to add solid gold or solid silver layers around it. The bridge piece makes the mix look intentional rather than accidental.
If you don’t have a two-tone piece, try a 2:1 ratio. Wear two gold pieces and one silver piece (or vice versa). This creates a deliberate contrast. A 1:1 ratio often looks like you got dressed in the dark, but a 2:1 ratio looks styled.
5. Styling for Specific Necklines
The most beautiful necklace stack will fail if it fights with the neckline of your top. The fabric frame determines the jewelry layout. You have to decide if the jewelry is sitting on the skin or on the fabric; try to avoid situations where the necklaces drift in and out of the shirt.
The V-Neck
This is the easiest canvas. A V-neck mirrors the natural shape of hanging necklaces. You want your shortest chain to sit well above the fabric edge, and your longest pendant to end just before the “V” closes. If the pendant falls inside the shirt, you lose the effect.
The Crew Neck
High, round necklines are tricky. You have two options here. Option one is to wear short, chunky collar-style necklaces that sit on top of the fabric, essentially creating a jeweled collar. Option two is to go very long with your layers, ensuring the shortest chain clears the neckline of the shirt by at least two inches. Avoid delicate 16-inch chains here; they will constantly slip under the collar.
The Button-Down Shirt
This offers great versatility. For a sexy, evening look, unbutton deep and fill the open space with cascading delicate layers. For a professional daytime look, button it higher and wear a short, bold statement chain under the collar, peeking out at the throat.
The Turtleneck
Here, the fabric is your display bust. Since you are layering over fabric, you can get away with heavier, chunkier pieces that might be uncomfortable directly on the skin. Long pendants are essential here to break up the visual block of fabric on the chest.
6. Practical Maintenance: Preventing the Tangle
Let’s talk about the reality of wearing multiple chains: the tangle. It is inevitable to some degree, but as a stylist, I have a few tricks to minimize it. Tangling happens when chains of similar weights twist around each other due to body movement.
The first defense is weight distribution. As mentioned earlier, heavier pendants at the bottom anchor the stack. If all your chains are feather-light, they will float and knot instantly.
The “Clasp Trick”:
If you are wearing two necklaces and they keep spinning around so the clasps end up in the front, try linking them together. Open the clasp of necklace A, attach it to the hook of necklace B. Open the clasp of necklace B, and attach it to the hook of necklace A. You have now created one giant, double-looped necklace. This adds weight to the back of the neck and keeps the layers separated.
For those who wear stacks daily, I highly recommend investing in a “layering clasp” or “detangler.” These are magnetic tubes that you attach your necklaces to. They space the chains out perfectly at the back of your neck and allow you to take the whole stack on and off with one click.
Finish & Styling Checklist
Before you walk out the door, run through this quick mental checklist to ensure your layering is on point:
- Check the spacing: Is there roughly two inches between each drop?
- Check the focal point: Does the eye have a place to rest (usually the bottom pendant)?
- Check the neckline: Are the chains sitting clearly on skin or clearly on fabric, not hovering in between?
- Check the weights: Is the bottom piece heavy enough to keep the stack centered?
- Check the metals: If mixing, is there a unifying element or a deliberate balance?
FAQs
Can I layer chunky statement necklaces?
Yes, but proceed with caution. If you are layering chunky pieces, stick to two rather than three. Pair a thick chain choker with a slightly longer, heavy link chain. Keep your earrings minimal to avoid overwhelming your face.
How do I sleep with layered necklaces?
Honestly? You don’t. While it is tempting to leave fine jewelry on, sleeping in layers guarantees a knot that might require a jeweler to untangle. It also weakens the chains. Take them off, or at the very least, leave only the shortest, tightest choker on.
Does rose gold work in a mixed metal stack?
Absolutely. Rose gold acts as a wonderful softener. It blends beautifully with yellow gold for a warm look, or with silver for a cool, mixed-industrial vibe. Treat it as a neutral.
How many necklaces are too many?
For day-to-day wear, three is usually the magic number. It provides beginning, middle, and end. For evening or festival looks, you can go up to five, provided the chains are varied in thickness. If you look in the mirror and your neck looks short or crowded, remove one layer.
Conclusion
Layering necklaces is less about following rigid rules and more about understanding balance and proportion. It is one of the few areas of fashion where more is often more. By paying attention to chain lengths, playing with texture, and respecting your neckline, you can turn even the simplest pieces in your jewelry box into a signature look.
Start with the basics—a choker, a mid-length chain, and a pendant—and experiment from there. Trust your eye. If it feels too heavy, it probably is. If it feels boring, add texture. The perfect stack should feel like a collection you have gathered over time, effortless and uniquely yours.
Picture Gallery


