Layering Necklaces Creating Depth With Multiple Chains
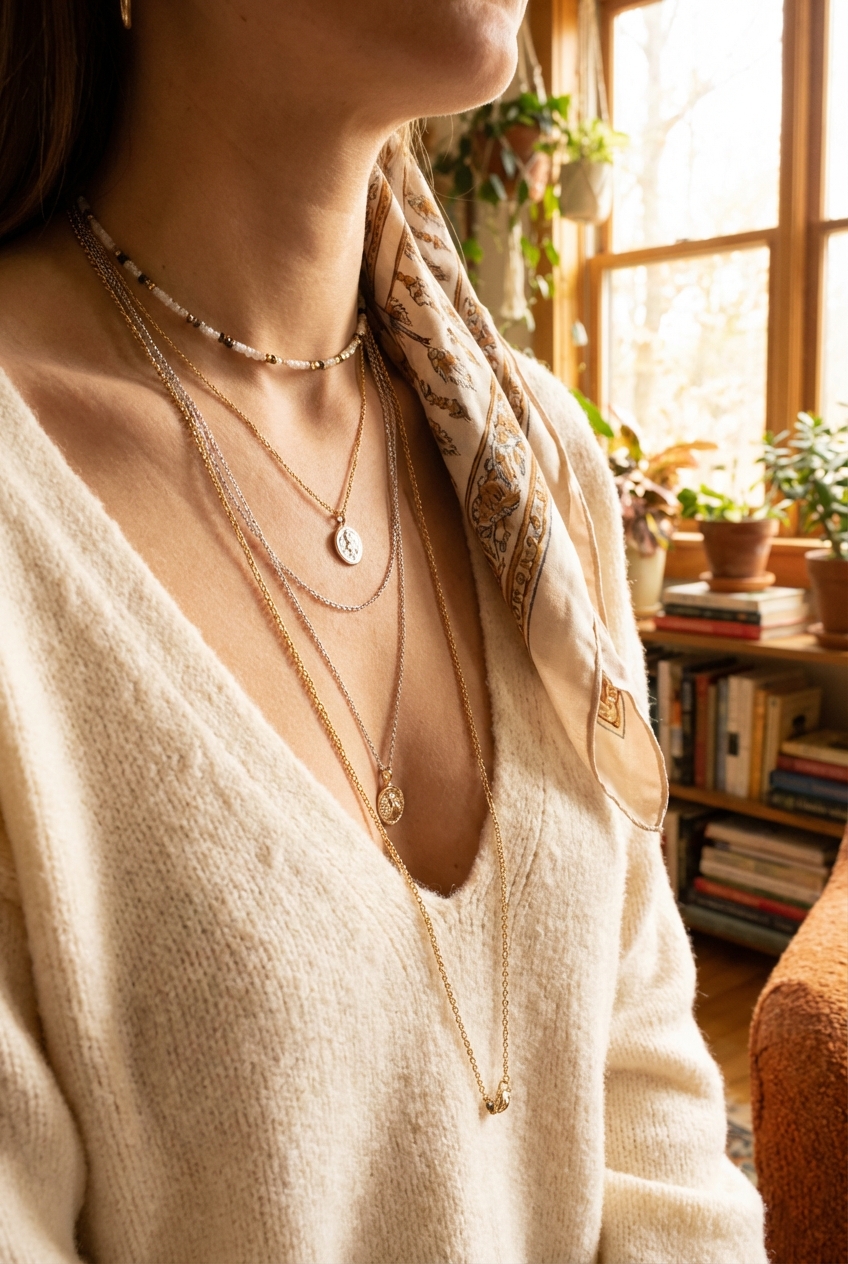
There is a distinct art to the “neck mess.” In the world of high-end styling, we often treat jewelry not just as an accessory, but as the final layer of texture that completes a silhouette. Layering necklaces is the easiest way to elevate a simple cashmere sweater or a crisp white button-down into something that feels intentional and curated.
However, achieving that effortless, cascading look is rarely as simple as throwing on three random chains. Without a strategy, you end up with a tangled knot of metal that looks cluttered rather than chic. It requires understanding balance, weight distribution, and the interplay of light against different metal finishes.
I have spent years curating stacks for editorial shoots and private clients, and the rules of engagement are always the same. We want movement, we want distinct tiers, and we want a focal point. For visual inspiration on how to execute these combinations, make sure to check out the Picture Gallery at the end of the blog post.
The Architecture of Length: The Two-Inch Rule
The most fundamental error in layering necklaces is choosing chains that are too similar in length. When chains sit at the same elevation on the chest, they compete for space and inevitably tangle. To create a defined look, you must treat the neck and chest as a vertical canvas.
In the design world, we refer to this as establishing a visual hierarchy. Each chain needs its own “lane” to shine. The general rule of thumb for a successful stack is to leave at least two inches of space between each necklace. This spacing allows the eye to travel down the torso, elongating the neck and preventing the jewelry from looking like a choker that slid down.
When building a stack from scratch, I always start with the shortest piece and work my way down. If you start with a 16-inch chain, your next tier should ideally be 18 or 20 inches. This creates distinct separation. If you try to layer a 17-inch chain with a 16-inch chain, they will overlap and lose their individual impact.
Standard Chain Measurements
- 14 to 15 inches (Choker): Sits high on the neck or right at the hollow of the throat. This is your foundation.
- 16 inches (Collar): Falls around the base of the neck/collarbone. The most common length for a solitary pendant.
- 18 inches (Princess): Sits below the collarbone. This is the standard “mid-length” in a stack.
- 20 to 24 inches (Matinee): Reaches the center of the bust. Ideal for heavier pendants or lockets.
- 30+ inches (Opera): Sits below the bust. Used for dramatic elongation.
Designer’s Note: The Clasp Counterbalance
A common frustration is the “spinning necklace,” where the clasp rotates to the front. This happens because the pendant isn’t heavy enough to anchor the chain. When selecting pieces for a stack, ensure your longest layers have enough weight (a stone or heavy pendant) to keep gravity working in your favor.
Mixing Textures and Chain Styles
Once you have your lengths established, you must look at texture. If you layer three delicate cable chains of the same width, they will disappear into one another. The secret to a high-end look is contrasting the weight and weave of the metal.
Think of this like interior design: you wouldn’t put a velvet sofa on a velvet rug with velvet curtains. You need contrast to create depth. In jewelry, this means mixing a flat, reflective surface with something woven or rounded.
For example, a flat herringbone chain acts like a ribbon of liquid gold—it reflects light intensely. Pair that with a rope chain, which has a twisted, three-dimensional texture that absorbs light differently. This contrast ensures that even if the metals are the same color, the eye can distinguish between the layers.
Essential Chain Weaves for Layering
- Paperclip Chain: Modern, airy, and architectural. Great for adding volume without visual heaviness.
- Snake Chain: Sleek, solid, and completely smooth. It doesn’t kink easily, making it a great base layer.
- Box Chain: Sturdy and geometric. Excellent for holding heavier pendants.
- Figaro Chain: Features a pattern of alternating small and large links. Adds a vintage Italian aesthetic.
Common Mistakes + Fixes
Mistake: Wearing three chunky statement chains at once.
Fix: Apply the “sandwich” method. Use a chunky chain in the middle, flanked by a delicate choker above and a thin pendant chain below. This balances the visual weight.
The Anchor Piece: Selecting a Focal Point
Every well-composed stack needs an anchor. This is usually the lowest or second-lowest necklace in the group, and it serves to draw the eye downward. Without a focal point, the layers can feel aimless, like a collection of lines leading nowhere.
The anchor piece is usually a pendant. This could be a coin, a locket, a gemstone, or a personalized charm. The weight of this pendant performs a functional duty as well: it pulls the longest chain taut into a V-shape.
This V-shape creates a beautiful geometric contrast against the curved U-shapes of the shorter, lighter chains above it. That interplay of geometry—curves vs. angles—is what makes a stack look professionally styled.
What I’d Do in a Real Project
If I am styling a client for a dinner event wearing a deep V-neck dress, I focus heavily on the anchor.
- Top Layer: A 15-inch diamond tennis necklace or simple gold snake chain.
- Middle Layer: An 18-inch textured rope chain.
- Bottom Layer (The Anchor): A 22-inch chain with a substantial coin pendant or emerald stone.
This configuration fills the open skin exposed by the dress without overcrowding the collarbones.
Navigating Necklines
Your clothing provides the background for your jewelry. The neckline of your top dictates the shape and length of your necklace stack. Ignoring the neckline is the fastest way to make an outfit look disjointed.
The goal is to either mirror the neckline or contrast it intentionally. You generally want to avoid having your necklaces fall exactly on the hem of your shirt. They should either sit clearly on the skin above the fabric, or sit clearly on top of the fabric below the neckline.
When a necklace constantly dips in and out of a shirt collar, it looks messy and unintentional. It also increases the friction on the chain, which can lead to snagging delicate knits or silk blouses.
Styling Rules by Neckline
- Crew Neck: This is a blank canvas. You have two options: wear a short collar-length stack that sits entirely on the skin above the rim, or wear longer chains (20+ inches) that sit entirely on the fabric.
- V-Neck: Mirror the shape. Use a pendant that drops into the V. A graduated stack works perfectly here as it fills the negative space.
- Button-Down Shirt: Unbutton the top two or three buttons. Fill the gap with a delicate, cascading stack. Avoid chunky chokers here, as the collar already adds bulk to the neck area.
- Turtleneck: Go long and heavy. Delicate chains get lost on chunky knitwear. Use thick links and large pendants that stand out against the wool.
Mixing Metals: The Modern Approach
For decades, the old guard of fashion dictated that you pick a side: silver or gold. Those days are over. In the modern luxury landscape, mixing metals is not only permitted; it is a sign of a sophisticated eye. It suggests you collect pieces over time rather than buying a matching set from a catalogue.
However, mixed metal styling requires balance. You cannot simply wear five gold chains and one random silver one; the silver will look like a mistake. The key is integration and repetition.
I recommend using a “bridge piece.” This is a single item that contains both silver and gold tones—perhaps a watch with a two-tone band, or a chain that interlocks both metals. Once you have that bridge, you have the license to layer both metals freely.
Pro-Level Ratio
If you don’t have a two-tone bridge piece, aim for a 60/40 split. If your outfit feels warmer (creams, browns, reds), go 60% gold and 40% silver. If your outfit is cooler (blays, blues, blacks), flip the ratio. Distribute the metals throughout the stack so they look interwoven.
Designer’s Note: Skin Undertones
While you can mix metals, your skin tone usually has a preference.
- Cool Undertones (Veins look blue): Silver, platinum, and white gold pop more.
- Warm Undertones (Veins look green): Yellow gold and rose gold create a rich glow.
- Neutral Undertones: You can wear anything with equal brilliance.
I usually place the metal that flatters the skin tone best closest to the face (the choker layer), and mix the other metal in lower down.
Practical Wearability: Preventing the Tangle
We have discussed the aesthetics, but as a practical stylist, I must address the physics of wearing multiple chains. Necklaces tangle. It is a fact of life. However, you can mitigate the mess with a few trade secrets.
Tangling happens when chains are too light and move too much. Heavier chains stay put. Mixing chain weights helps lock the lighter chains in place. Additionally, the clasp is often the culprit. The heavy clasp slides to the front, catches on another chain, and begins the knotting process.
There is a tool called a “necklace detangler” or “spacer.” It is a single clasp mechanism that splits into two or three attachment points. You attach your necklaces to this spacer behind your neck. It keeps the chains separated by a fixed distance at the nape of the neck, making it physically impossible for them to twist around each other at the source.
Daily Maintenance Checks
- Check the Clasp: Before putting a chain on, ensure the clasp spring is tight. Loose clasps snag hair and other chains.
- Storage matters: Never throw a stack of necklaces into a jewelry dish together. Hang them individually. A tangled mess in the morning will deter you from styling your look.
- Hair spray first: If you are styling your hair, do it before putting on your jewelry. Chemicals in hairspray and perfume can dull the finish of high-end plating and softer gemstones like pearls or turquoise.
Finish & Styling Checklist
Before you walk out the door, run through this quick mental checklist to ensure your stack is polished and secure.
1. Check the spacing: Are there distinct gaps between your layers, or are they bunching up? Adjust the extenders if necessary.
2. Test the movement: Lean forward and stand back up. Do the necklaces fall back into place, or do they catch? If they catch, you may have two chains with too much surface friction (like two snake chains). Remove one.
3. Verify the focal point: Look in the mirror. Does your eye know where to look? If not, add a pendant to the lowest layer.
4. Lighting check: If you are mixing metals, ensure they look cohesive in natural light, not just bathroom lighting.
5. Comfort check: Is the weight on the back of your neck comfortable? If it feels heavy, you might be carrying too much tension.
FAQs
Can I sleep in my layered necklaces?
I strongly advise against it. Sleeping in layers guarantees tangles that can be nearly impossible to undo without breaking delicate links. Furthermore, friction against bedding can weaken gold plating over time. Take them off as a ritual at the end of the day.
How do I stop my hair from getting caught in the clasps?
This is a common issue with fine chains. The best fix is to buy a small silicone tube covers designed for clasps, or simply wear your hair up. Alternatively, look for chains with “lobster” clasps rather than “spring ring” clasps, as the construction is smoother and less likely to snag hair.
Does this work for chunky costume jewelry?
The principles of spacing (2-inch rule) remain the same, but the scale changes. With chunky costume pieces, stick to a maximum of two layers. Three heavy costume pieces can look costume-y in a theatrical way, rather than high-fashion.
What if I only have necklaces of the same length?
Buy chain extenders. They are inexpensive adapters that clip onto your existing necklace clasp, adding 2 to 4 inches of length. This allows you to turn three 16-inch necklaces into a 16, 18, and 20-inch stack instantly.
Conclusion
Layering necklaces is about more than just showing off your jewelry collection. It is a way to add personality and finish to an outfit. It brings light to the face and creates a vertical line that flatters the silhouette.
Remember that confidence is the final ingredient. You might feel that a three-chain stack is “too much” if you aren’t used to it, but in the context of a full outfit, it often provides the balance that was missing. Start with two pieces—a simple chain and a pendant—and work your way up as you get comfortable with the weight and the movement.
Fashion is meant to be playful. Don’t be afraid to mix your grandmother’s vintage locket with a modern paperclip chain. That tension between the old and the new, the heavy and the light, is exactly what creates style.
Picture Gallery


