Legendary Maleficent Nails
There is a specific kind of energy that shifts when you trade a sensible nude manicure for something sharp, dark, and undeniably powerful. We often talk about power dressing through blazers and heels, but the most lethal accessory in your arsenal is often at your fingertips. The “Maleficent” aesthetic isn’t just about Disney fandom; it is a masterclass in high-fashion edge, focusing on architectural shapes and deep, complex color stories.
I have styled countless editorial shoots where the model’s attitude completely transformed the moment the nail tech finished a set of stiletto claws. It brings out a regal, villainous confidence that is difficult to replicate with clothing alone. Whether you are looking for a subtle nod to the Mistress of Evil or a full-blown avant-garde statement, this look requires precision and an understanding of scale.
In this guide, we are going to break down how to execute this look with sophistication rather than making it look like a Halloween costume. We will cover the structural integrity required for extreme lengths, the color theory behind “almost black” shades, and the maintenance required to keep your claws looking expensive. If you are looking for visual inspiration, make sure to check out our curated Legendary Maleficent Nails Picture Gallery at the end of this blog post.
The Architecture of the Stiletto Shape
The foundation of any Maleficent-inspired nail is the shape. While coffin and almond shapes are popular, the true essence of this look lies in the stiletto. This shape elongates the fingers and creates a dangerous, elegant silhouette that mimics a talon or a thorn.
However, shaping a stiletto nail is not as simple as filing the sides until they meet. As a fashion stylist, I often see “stiletto” nails that are actually just tapered almonds. A true stiletto comes to a distinct, sharp point that requires length to balance out the width of the nail bed.
If your natural nails are wide, you need significant length to create a gradual taper. If you try to force a sharp point on a short nail, it will look triangular and stubby. Proportions are everything here.
Designer’s Note: The number one issue with this shape is structural weakness. Because you are filing away the sidewalls—which provide the nail’s strength—you must reinforce the “apex” (the highest point of the nail’s arch). I always recommend using a builder gel or hard gel overlay, even if you are keeping your natural length.
The Palette: Beyond Basic Black
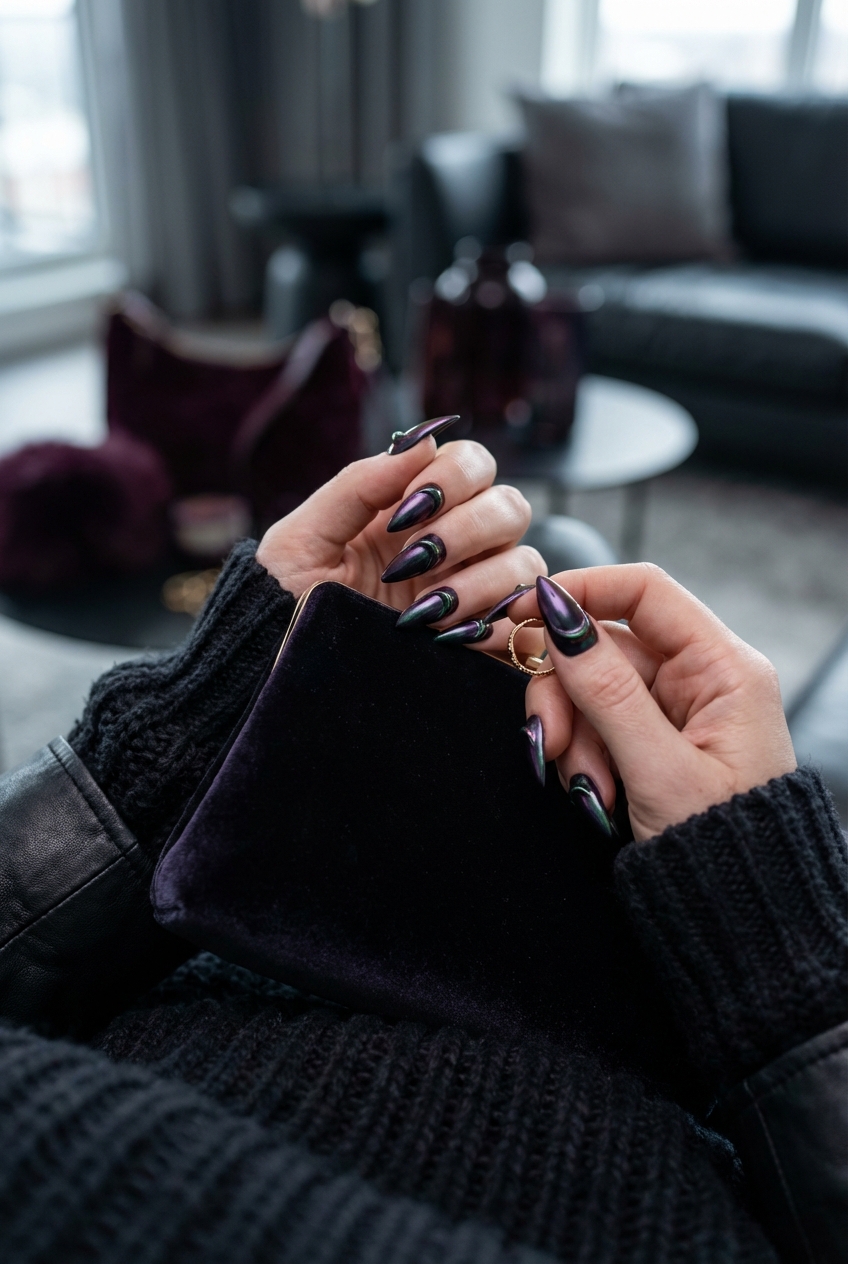
While Maleficent wears black, her world is painted in toxic greens, deep purples, and chrome accents. A flat black polish can often look one-dimensional or harsh against certain skin tones. To elevate the look to a high-fashion standard, we need to look for depth and dimension.
I prefer using “obsidian” shades. These are colors that appear black in low light but reveal a rich purple, green, or blue under direct lighting. This adds a layer of mystery and luxury that flat crème black lacks.
For a true nod to the character, incorporate “poison apple” green. This shouldn’t be a neon slime green, but rather a deep, metallic emerald or a chartreuse cat-eye effect. It mimics the magical flames associated with the character’s power.
Common Mistakes + Fixes
- Mistake: Using a single coat of black that looks streaky or gray.
- Fix: Always apply two thin coats of a highly pigmented black, or layer a deep purple over a black base for a custom “midnight” hue.
- Mistake: Choosing a matte topcoat that shows scratches immediately.
- Fix: If you love the matte look, use a “velvet” matte topcoat which is more durable, or wipe your nails with alcohol daily to remove oils that ruin the matte effect.
The “Louboutin” Under-Paint Technique
One of the most legendary ways to style this manicure is to utilize the underside of the nail. Just as a red sole defines a Louboutin shoe, painting the underside of your nail tip creates a flash of color that is only visible when you move your hands.
For a Maleficent vibe, I recommend painting the top of the nail a glossy black or deep chrome. Then, paint the underside a vibrant, metallic green or a rich royal purple. It is a subtle detail that screams luxury.
This technique works best on acrylics or sculpted gel extensions where the underside is smooth. If you have natural nails, you will need to keep the underside scrupulously clean, as the color can highlight any debris.
Textural Contrast: Matte vs. Chrome vs. Velvet
In interior design, we mix textures to keep a monochromatic room interesting. The same rule applies to your hands. Since we are working with dark colors, playing with light reflection is crucial to stop the nails from looking like black blobs.
Try a “French” manicure using textures instead of colors. Paint the nail bed in a matte black and the tip in a high-gloss black. This creates a sophisticated, tonal contrast that catches the light beautifully.
Another high-end option is the “cat eye” or velvet magnetic polish. Using a magnet to pull the metallic particles into a sharp diagonal line creates a slit-pupil effect, reminiscent of a dragon’s eye. It is thematic without being cheesy.
What I’d do in a real project: styling the hand
- Thumb & Pinky: Solid glossy black for framing.
- Index Finger: Deep emerald green magnetic cat-eye.
- Middle Finger: Matte black with a glossy French tip.
- Ring Finger: Black base with chrome powder rubbed over a 3D textured swirl (mimicking thorns).
Hardware and 3D Elements
To truly embrace the legendary status of this aesthetic, we need to look at 3D nail art. This is trending heavily on runways. We aren’t talking about plastic gems; we are talking about architectural gel work.
Chrome “molten metal” drips are perfect here. Having silver or gunmetal chrome sculpted to look like thorns wrapping around the nail adds an armor-like quality. It feels protective and fierce.
Keep the hardware silver or gunmetal. Gold tends to soften the look too much. The Maleficent aesthetic is cold, sharp, and metallic. If you must use stones, opt for onyx, hematite, or Swarovski crystals in “Volcano” or “Emerald” effects.
Designer’s Note: Placement matters. Don’t put thick 3D art right at the cuticle or the very tip. Place it in the center or slightly off-center to maintain the structural balance of the nail and prevent snagging on your clothes.
Maintenance for the Villain Era
High-end fashion is nothing if it isn’t maintained. A chipped stiletto nail ruins the illusion of power immediately. Dark colors highlight regrowth much faster than nudes, so you need a strategy.
You must use cuticle oil daily. Dark polish draws attention to the skin around the nail. Dry, white cuticles against black polish look unkempt. Keep a pen in your bag and apply it after washing your hands.
Schedule your fills every 2 to 3 weeks. Do not stretch it to 4 weeks. The length of a stiletto acts as a lever; as the nail grows out, the stress point moves forward. If you wait too long, a simple tap against a door handle can snap the nail painfully.
Living with Extreme Lengths
I often get asked by clients, “How do you function with those?” The truth is, you adapt your movements. You stop using your fingertips and start using the pads of your fingers.
When typing, hold your hands flatter. When opening cans, use a spoon or the side of your finger (never the nail). Treat your nails like jewels, not tools. This mindset shift is essential for keeping the set intact.
Also, consider your jewelry. Since the nails are a major statement, your rings need to balance them. I love stacking thin midi-rings in silver to complement the length. Avoid chunky, round rings that compete with the sharp lines of the stiletto.
Finish & Styling Checklist
Before you head to the salon or attempt this at home, run through this checklist to ensure you are getting a couture result rather than a costume look.
The “Runway Ready” Audit:
- Shape Check: Is the point centered perfectly? If the point is crooked, the whole finger looks twisted.
- Opacity Check: Hold your hand up to a light. If you can see through the black polish, it needs another coat. It should be solid.
- Undertone Match: If you have cool skin tones, opt for blue-based blacks or silver chrome. If you have warm tones, look for purple-based blacks or gunmetal.
- Texture Balance: Do you have too much going on? If you have chrome, 3D art, and glitter, remove one element. Edit down for sophistication.
- Top Coat Quality: Ensure you are using a non-yellowing top coat. Some top coats turn cloudy over dark colors, ruining the obsidian effect.
FAQs
Can I achieve this look with natural nails?
Yes, but with caveats. You need to grow them out significantly to get a true stiletto shape. Natural nails are often too weak at this length to hold a sharp point without breaking. I highly recommend a structured gel overlay (BIAB) to give your natural nails the strength of acrylic without the damage.
Is this office appropriate?
It depends on your industry. In creative fields like fashion, design, or beauty, absolutely. In conservative corporate environments, you might want to soften the shape to a sharp almond and stick to a solid deep plum or rouge noir rather than a true black or chrome.
How do I take my contact lenses out with stiletto nails?
This is the most common fear! You simply use the pads of your index finger and thumb, rather than the tips. Pinch the lens gently with the fleshy part of your fingers. It takes practice, but it is entirely possible and safe once you adjust your angle.
What is the best way to remove dark polish without staining my skin?
Apply a heavy layer of cuticle oil to the skin around your nail before you apply the remover. The oil acts as a barrier. Soak a cotton pad in remover, press it onto the nail for 10 seconds, and swipe down towards the tip. Do not scrub back and forth.
Conclusion
Adopting the Legendary Maleficent Nail aesthetic is about more than just picking a dark color. It is about embracing a sharper, more deliberate way of presenting yourself. It combines the architectural drama of the stiletto shape with the rich, mysterious depth of villain-inspired hues.
Whether you choose a hidden pop of green on the underside or a full set of chrome thorns, this style demands confidence. It requires maintenance and a slight adjustment to how you move your hands, but the visual payoff is immense. You aren’t just getting a manicure; you are putting on armor.
Picture Gallery


