The Charm Bracelet Revival How To Wear It Stylishly
Fashion has a way of circling back, reinventing the sentimental favorites of the past into the must-haves of the present. I remember clearly the first time I invested in a serious charm bracelet; it wasn’t just a piece of jewelry, but a tactile diary I could wear on my wrist. I found a heavy, gold curb chain at an estate sale in London and spent the next decade slowly hunting for charms that marked career milestones and travels.
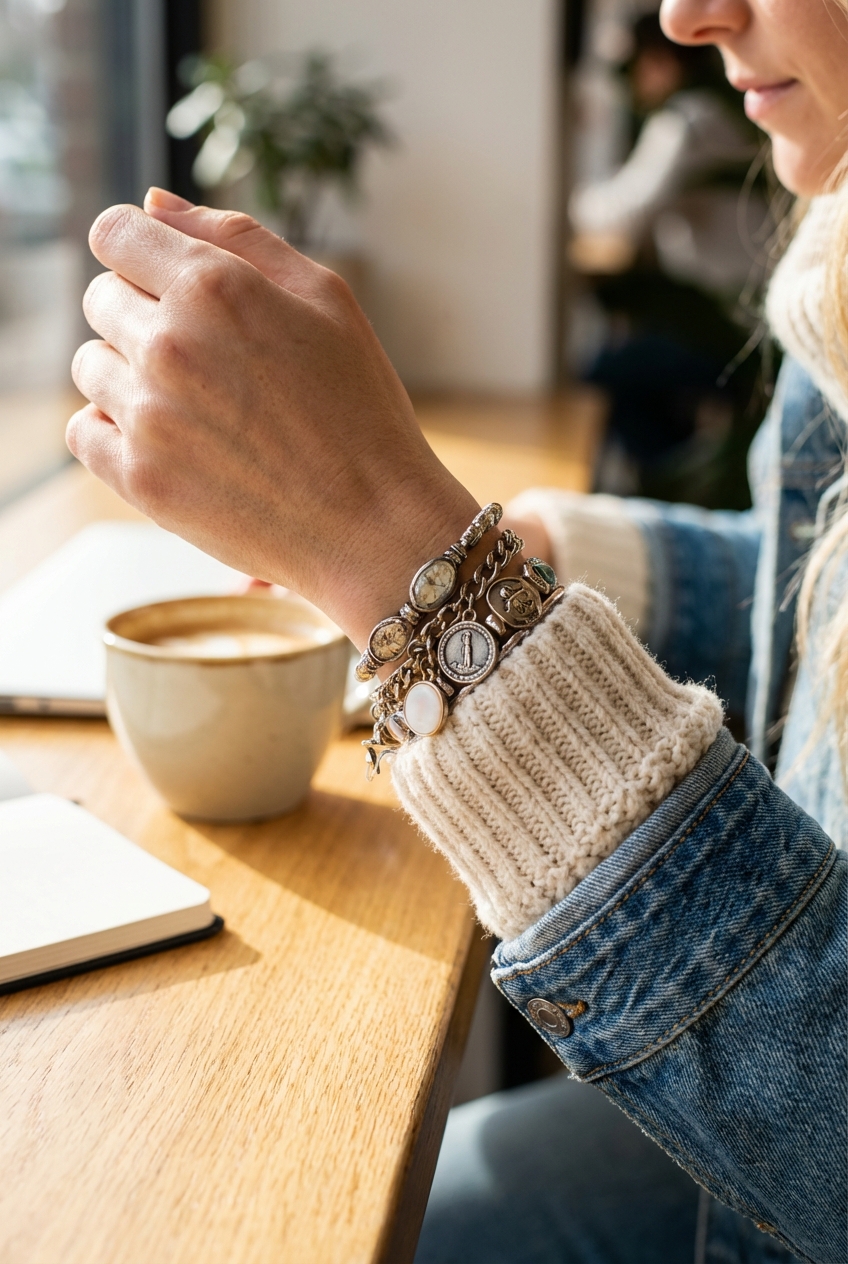
The modern revival of the charm bracelet isn’t about the cluttered, noisy jumbles of the early 2000s. Today, it is about intentional curation, balancing negative space with meaningful tokens, and treating the bracelet as a serious architectural element of your outfit. As a stylist, I have watched this trend evolve from kitschy to couture, finding its way onto the runways and into the collections of high-jewelry houses.
Whether you are inheriting a vintage piece or starting a fresh collection with a modern paperclip chain, the rules of engagement have changed. We are focusing on quality over quantity, mixing metals with confidence, and understanding how to stack without looking chaotic. If you need visual inspiration on how to balance these elements, make sure to check out the Picture Gallery at the end of the blog post.
The Modern Aesthetic: Curation Over Clutter
The biggest shift in the charm bracelet revival is the concept of “breathing room.” In previous decades, the goal was often to fill every single link until the bracelet resembled a heavy, jingling cuff.
The high-fashion approach today prioritizes the visibility of the individual charms and the quality of the chain itself. You want to see the silhouette of each pendant. When I style clients, I often recommend leaving at least two to three empty links between charms depending on their size.
This minimalist approach allows for better movement. When charms are too packed, they tend to bunch up, scratching against one another and damaging delicate enamel or soft gemstones. A curated look feels more expensive and intentional.
Designer’s Note: The Weight Balance Lesson
One of the most frequent issues I see with DIY charm bracelets is uneven weight distribution. I once had a client bring in a bracelet where all the heavy, solid gold charms were on one side, and the lighter, hollow charms were on the other.
The result was that the heavy side constantly slid to the underside of her wrist, banging against desks and tables, while the lighter side sat visibly on top. To fix this, you must alternate heavy and light pieces to ensure the bracelet stays centered on the wrist bone.
Choosing Your Foundation: Chain Styles and Metals
The chain is the canvas, and in the current market, the texture of the chain is just as important as the charms. The classic Rolo chain (round links) is timeless, but it can look a bit dated if not styled correctly.
For a contemporary edge, I recommend looking into elongated paperclip links or heavy curb chains. Paperclip chains offer a more geometric, airy look that feels very current. They also allow you to clip charms on and off easily if you use lobster clasps, making the piece versatile.
When it comes to metals, we are no longer restricted to just silver or just gold. Mixed metal styling is a sign of a sophisticated eye. A sterling silver chain with 14k gold charms creates a beautiful depth and allows you to wear the piece with any other jewelry in your collection.
Common Mistakes + Fixes
Mistake: Buying a chain that is too delicate for the charms.
Fix: If you plan to wear solid gold or heavy stone charms, the chain link needs to be substantial. A good rule of thumb is that the chain link wire thickness should be at least 1mm to 1.5mm for daily wear.
Mistake: Ignoring the clasp mechanism.
Fix: Heavy charm bracelets put immense strain on clasps. Avoid simple spring-ring clasps. Opt for a sturdy lobster claw or a toggle clasp, which adds an extra design element and security.
The Art of the Stack: Wrist Scaping
Wearing a charm bracelet in isolation is elegant, but stacking it is where the real fashion magic happens. However, because a charm bracelet is inherently 3D and bulky, it is the “sofa” of your wrist layout—it is the biggest piece that dictates where everything else goes.
You never want to pair a charm bracelet directly next to a delicate silk cord or a hollow bangle that dents easily. The charms act like little hammers.
I prefer to sandwich a charm bracelet between a flat snake chain and a solid cuff. This adds texture variation without causing damage. If you wear a watch, wear the charm bracelet on the opposite hand to prevent the charms from scratching the sapphire crystal or metal casing of your timepiece.
What I’d Do in a Real Project
If I were styling a client for a photo shoot or an event, here is the stack I would build:
- Base: The charm bracelet (the hero piece).
- Upper Wrist: A solid metal cuff or bangle that sits tighter on the forearm. This acts as a “stopper” to keep the charm bracelet from sliding too far up.
- Lower Wrist: A tennis bracelet. The sparkle of the diamonds contrasts beautifully with the metal-heavy look of the charms.
Selecting and Placing Your Charms
There is a rhythm to a well-designed bracelet. The human eye finds odd numbers more visually pleasing than even numbers. I typically aim for 3, 5, or 7 charms on a standard bracelet.
Scale is critical here. If you have a massive coin charm, it should be your center anchor. Place it in the middle of the chain, and work your way out with slightly smaller charms.
Consider the “drop length” of the charm as well. You do not want charms that hang down more than an inch, or they will constantly catch on laptop keyboards, dinner plates, and clothing.
Pro-Level Rules of Thumb
- Spacing: For every 1 inch of charm width, leave 0.5 inches of empty chain.
- The Anchor: Place your heaviest or most significant charm in the absolute center.
- The buffers: If you have two enamel charms, place a plain metal charm between them to prevent chipping.
Materials and Durability for Daily Wear
If you plan to wear your bracelet daily, you must be realistic about materials. Gold vermeil is a popular budget-friendly option, but charms endure more friction than earrings or necklaces.
The plating on vermeil charms will eventually wear off, especially on the high points that rub against the chain. For a permanent collection, solid gold (10k, 14k, or 18k) is the only material that will truly stand the test of time and retain its value.
For those who prefer the silver look, sterling silver is excellent, but it requires maintenance. Charms with intricate crevices will oxidize (turn black) quickly. You need to be prepared to dip or polish them regularly to keep the high-shine finish.
A Note on Vintage Charms
Vintage charms are incredibly popular right now, especially those from the 1950s and 60s. However, the “jump rings” (the loop connecting the charm to the bracelet) on vintage pieces are often worn thin.
Before wearing a vintage find, take it to a jeweler to have the jump rings inspected. I always recommend having charms soldered onto the bracelet. Soldering closes the loop permanently so the charm cannot slip off. It is a small investment (usually $10-$20 per charm) that prevents heart-breaking loss.
Styling for Occasions: From Office to Evening
The noise factor is a real consideration. In a quiet office or boardroom, a bracelet that sounds like wind chimes can be distracting and arguably unprofessional.
For professional settings, I suggest a “stationed” charm bracelet. This is a style where the charms are fixed to the chain and do not slide or jingle against each other. It provides the visual interest without the audio accompaniment.
For evening wear, you can go much bolder. This is the time to introduce color. Charms featuring precious stones—rubies, sapphires, emeralds—catch the low light of a restaurant or event space beautifully.
Fabric Constraints
As a stylist, I always check the client’s sleeves before adding a charm bracelet.
- Knits: Be very careful with prong-set stone charms. They are notorious for snagging chunky knit sweaters. Bezel-set stones (where the metal surrounds the gem smoothly) are safer for fall and winter fashion.
- Silk: Similar to knits, jagged charms can pull threads in silk blouses. Test your bracelet by running it over a pair of old tights. If it snags the tights, it will ruin your silk top.
Sourcing: Where to Find the Best Pieces
The hunt is half the fun. While big-name luxury houses offer stunning, ready-made options, building a custom piece feels more authentic to the revival trend.
Estate sales and reputable online vintage jewelry dealers are goldmines for unique charms. Look for hallmarks. A “585” stamp indicates 14k gold, while “925” indicates sterling silver.
Don’t ignore the potential of converting other jewelry. I have often taken a single earring (where the mate was lost) and had a jeweler convert it into a charm. It is a brilliant way to repurpose broken heirlooms into something wearable.
Finish & Styling Checklist
Before you head out the door, run through this quick mental checklist to ensure your wrist game is on point.
- The Shake Test: Shake your wrist. Does it feel too heavy on one side? If so, rearrange the order of charms to balance the weight.
- The Snag Test: Run your fingers over the charms. Are there any open jump rings or sharp prongs? Fix them before wearing delicate fabrics.
- The Clasp Check: Ensure the clasp is fully closed. If you have a safety chain, make sure it is hooked.
- The Noise Level: Is the sound appropriate for where you are going?
- The Shine: Give your gold or silver a quick buff with a microfiber cloth to remove fingerprints and lotion residue.
FAQs
Q: Can I mix gold and silver charms on the same bracelet?
A: Absolutely. This is a very modern way to wear charms. The key is to make it look intentional. Try to alternate them in a pattern (gold, silver, gold, silver) or use a two-tone chain to tie the look together.
Q: How do I measure my wrist for a charm bracelet?
A: Measure your wrist bone tightly with a tape measure, then add 1 inch to 1.5 inches. You need more slack for a charm bracelet than a regular bracelet because the bulk of the charms takes up the inner circumference.
Q: Should I solder my charms or use clip-ons?
A: For expensive or sentimental charms, soldering is non-negotiable. It is the only way to ensure they are secure. Clip-on clasps are fun for fashion jewelry or if you like to change your look daily, but they are prone to opening unexpectedly.
Q: Can I wear a charm bracelet with a long sleeve?
A: It is best worn with ¾ sleeves or pushed-up sleeves. Wearing it over a tight long sleeve (like a turtleneck) is a chic styling trick, provided the sleeve is fitted enough to hold the bracelet in place.
Conclusion
The charm bracelet revival is about reclaiming personal storytelling in a world of fast fashion. It allows you to slow down and curate a collection that is entirely unique to your life, your travels, and your taste. Whether you opt for a chunky gold stack or a refined, minimalist silver piece, the key is to wear it with confidence and care.
By paying attention to the technical details—weight distribution, chain quality, and jump ring security—you elevate a simple accessory into a high-end statement. Start with a good foundation, add meaningful pieces slowly, and don’t be afraid to mix eras and metals. It is one of the few pieces of jewelry that truly gets better with age.
Picture Gallery


