Trail Spa Vibes at Home — Darecations Bathroom Ideas
1) Introduction
There is a specific feeling you get after a long hike in the mountains. Your muscles are tired, your boots are dusty, and your mind is completely clear. The “Trail Spa” aesthetic captures the transition from that rugged outdoor adventure into a space of deep, restorative comfort. It is not just about putting a plant on the counter; it is about merging the raw textures of nature with the high-end functionality of a wellness retreat.
In my design practice, I often hear clients ask for a “sanctuary.” However, a true sanctuary needs to feel grounded, not just sterile and white. We achieve this by layering organic materials like slate, unlacquered brass, and raw wood against modern, clean lines. This style works equally well in a sprawling master bath or a tiny rental apartment because it relies on texture rather than square footage.
This guide will walk you through the exact steps I use to create these earthy, steam-filled escapes. We will cover everything from selecting the right light temperature to spacing your vanity correctly. You will find a curated Picture Gallery at the end of the blog post to visualize these concepts in action.
2) The Foundation: Materials and Earthy Textures
The core of the Trail Spa vibe is “Organic Brutalism.” You want materials that look like they were pulled directly from a riverbed or a forest floor. The goal is to avoid anything that looks too synthetic or plastic.
Start with your base surfaces. In a high-budget renovation, I prioritize natural stone like slate, soapstone, or honed travertine. These materials offer tactile feedback underfoot that porcelain simply cannot match. If you are on a budget, look for large-format porcelain tiles with a “variegated” matte finish to mimic natural stone variance.
Wood adds necessary warmth to cool stone surfaces. However, bathrooms are hostile environments for wood due to humidity. I recommend using teak, white oak, or walnut, provided they are properly sealed with a marine-grade matte varnish.
Designer’s Note: The Slip Factor
One lesson I learned the hard way involved a client who insisted on polished marble for a shower floor. It was beautiful until it got wet, at which point it became an ice rink.
For the Trail Spa look, always specify “honed,” “tumbled,” or “flamed” finishes for floors. These textures provide grip for wet feet and look more natural. If you must use ceramic, ensure it has a dynamic coefficient of friction (DCOF) rating of 0.42 or higher.
Common Mistakes + Fixes
Mistake: Using high-gloss subway tile everywhere.
Fix: Swap gloss for “Zellige” style tiles. These have uneven surfaces and raw edges that catch the light beautifully and feel handmade.
Mistake: Faux wood ceramic planks that look fake.
Fix: Avoid wood-look tile unless it is incredibly high-end. Instead, use real stone on the floor and bring in wood tones through the vanity or floating shelves.
3) Lighting Strategy: Setting the Mood
Lighting is the single most important factor in creating a spa atmosphere. In a trail-inspired bathroom, you are mimicking the dappled light of a forest or the glow of a sunset, not the harsh brightness of an operating room.
You need three distinct layers of light. The first is ambient light, usually from recessed cans. The second is task light, found at the vanity. The third is accent light, which creates the mood.
For color temperature, I strictly use 2700K to 3000K LED bulbs. 2700K provides a warm, candlelight glow, while 3000K is a crisp, clean white. Anything higher than 3500K will turn your slate and wood tones gray and clinical.
Pro Rules of Thumb for Lighting
- Sconce Height: Mount wall sconces so the bulb is roughly at eye level, usually 60 to 66 inches from the finished floor.
- Vanity Spacing: If using side sconces, place them 28 to 30 inches apart to evenly illuminate the face without casting shadows.
- Dimmer Switches: Every single light source in a spa bathroom must be on a dimmer. This is non-negotiable for relaxation.
What I’d Do in a Real Project
If I were designing a Trail Spa bath today, I would install a small, waterproof LED strip inside the shower niche. I would also add a low-wattage accent light under a floating vanity.
These act as nightlights and allow you to shower with the main overhead lights turned off. This creates an immediate sensory shift from “getting ready for work” to “winding down.”
4) Water Delivery: The Shower and Tub Experience
To truly replicate a spa, the way water is delivered matters more than the tub’s shape. You want volume and softness. This is where you should allocate a significant portion of your plumbing budget.
For the shower, a rain head is standard for this aesthetic, but it is rarely enough on its own. A ceiling-mounted rain head provides a gentle, soaking experience, but you need a wall-mounted handheld unit for cleaning and power washing.
If you have the space for a soaking tub, look for matte finishes. A matte white or matte black composite stone tub holds heat longer than acrylic and feels velvety to the touch.
Technical Specs to Watch For
- Shower Head Height: Plumbers often rough in shower heads at 80 inches. If you or your partner are tall, ask for 84 or even 86 inches to ensure you fit comfortably under the rain head.
- Valve Type: Use a thermostatic valve rather than a pressure-balance valve. This allows you to set the temperature once and leave it, turning the water on and off with volume controls only.
- Tub Filler Reach: Ensure the spout of your tub filler reaches at least 2 to 3 inches over the rim of the tub to prevent water from dribbling down the side.
Renter-Friendly Adjustments
If you cannot rip out plumbing, simply swap the shower head. High-quality filtered shower heads are available that screw onto existing pipes.
Look for models that include a built-in filter to remove chlorine and hard water minerals. This softens the water and improves hair and skin health, which is a core element of the spa experience.
5) Layout and Flow: Breathing Room
Spa bathrooms feel luxurious because they feel spacious, even if they are physically small. The secret is managing the negative space and sightlines.
In a Trail Spa aesthetic, we want to minimize visual clutter to mimic the openness of the outdoors. This means hiding the toilet whenever possible. If you do not have a separate water closet, try to position the vanity so it is the first thing you see when you open the door, rather than the toilet.
Spacing Rules for Comfort
- Toilet Clearance: You need at least 15 inches from the center of the toilet to the nearest wall or vanity. I prefer 18 inches for a more open feeling.
- Shower Bench: If building a shower bench, make it at least 12 to 14 inches deep. Anything shallower is useless for sitting or storing products.
- Walkways: Aim for at least 30 to 36 inches of walkway space between the vanity and the shower or opposite wall.
Storage Solutions
Use a “floating” vanity to increase the perception of floor space. Seeing the floor extend all the way to the wall makes the room feel wider.
However, floating vanities often lose storage space. Compensate for this by recessing a medicine cabinet into the wall. Modern medicine cabinets can be seamless and include internal outlets, keeping toothbrushes and razors off the counter.
6) Sensory Styling: Scent, Sound, and Touch
The “Trail” vibe relies heavily on engaging the senses. This is the difference between a room that just looks good and a room that feels restorative.
Start with textiles. Replace standard terry cloth with waffle-weave towels. They dry faster, which prevents musty odors, and the texture adds visual grit. Choose earthy colors like moss green, charcoal, or terracotta.
Scent is the invisible design element. For this specific vibe, you want woodsy and herbal notes. Hinoki cypress, cedar, eucalyptus, and vetiver are ideal.
The Plant Life
Plants are essential for the Trail vibe, but they must be realistic for your lighting conditions.
- Low Light: Snake plants and ZZ plants thrive in dark corners.
- High Humidity: Ferns and pothos love the moisture from a shower.
- No Light: Use dried eucalyptus bundles tied to the shower head. The steam releases the oils, creating a natural aromatherapy experience without needing sunlight.
Common Styling Mistakes
Mistake: Using a tiny bath mat in front of a double vanity.
Fix: Use a vintage runner rug or a long woven mat. It should span the length of the vanity, leaving about 4 to 6 inches of floor visible on either end. This anchors the room and adds warmth.
Mistake: Displaying branded plastic bottles.
Fix: Decant everything. Shampoo, conditioner, and soap should go into matching amber glass or stone pump bottles. This reduces visual noise and instantly elevates the shower to hotel status.
7) Finish & Styling Checklist
Use this checklist to ensure you have hit every element of the Trail Spa design.
Phase 1: The Shell
- Select matte or honed finish tiles (stone or stone-look).
- Choose a warm wood tone for the vanity or shelving (Teak/Walnut/Oak).
- Paint walls a warm neutral (avoid cool, blue-based whites).
Phase 2: The Fixtures
- Install lighting with 2700K-3000K bulbs.
- Put all switches on dimmers.
- Select a rain shower head and a handheld wand.
- Verify plumbing heights (Shower head 80″+, Sconces 60-66″).
Phase 3: The Styling
- Swap plastic bottles for amber glass or ceramic dispensers.
- Hang a waffle-weave robe or towels on hooks.
- Add live plants or dried eucalyptus bundles.
- Place a vintage runner or teak mat on the floor.
- Introduce a woodsy scent (candle, diffuser, or room spray).
8) FAQs
Q: Can I achieve this look in a rental without renovating?
A: Absolutely. Focus on the styling layer. Swap the shower head for a filtered one. Change the cabinet hardware to unlacquered brass or matte black. Use peel-and-stick wallpaper with a grasscloth texture to mimic natural materials. Lighting is key, so use lamps or plug-in sconces if the overhead lighting is harsh.
Q: Is natural stone hard to maintain?
A: It requires more care than porcelain. Natural stone is porous. You must seal it upon installation and reseal it annually. Avoid acidic cleaners (like vinegar or lemon) as they will etch the stone. If you want the look without the work, high-end porcelain mimics are the way to go.
Q: How do I mix metal finishes?
A: A good rule of thumb is to mix one cool metal with one warm metal. For example, matte black fixtures (cool/neutral) look great with aged brass hardware (warm). Avoid mixing two similar metals, like brushed nickel and chrome, as it looks like a mistake.
Q: What if my bathroom has no windows?
A: Lean into the “cave” vibe. Darker paint colors like charcoal or forest green can actually make a windowless bathroom feel cozy and expansive, rather than small and dingy. Ensure your artificial lighting is layered and warm to compensate for the lack of daylight.
9) Conclusion
Creating a Trail Spa vibe at home is about intentionality. It is about choosing materials that age gracefully and designing a layout that encourages you to slow down.
You do not need a mountain lodge to capture this feeling. By focusing on tactile materials, warm lighting, and efficient water delivery, you can turn a standard suburban bathroom into a restorative escape. Remember that the goal is not perfection; it is creating a space that feels grounded and real.
Start with one small change, perhaps upgrading your shower head or switching out your light bulbs, and build the atmosphere from there. Your daily routine deserves that moment of pause.
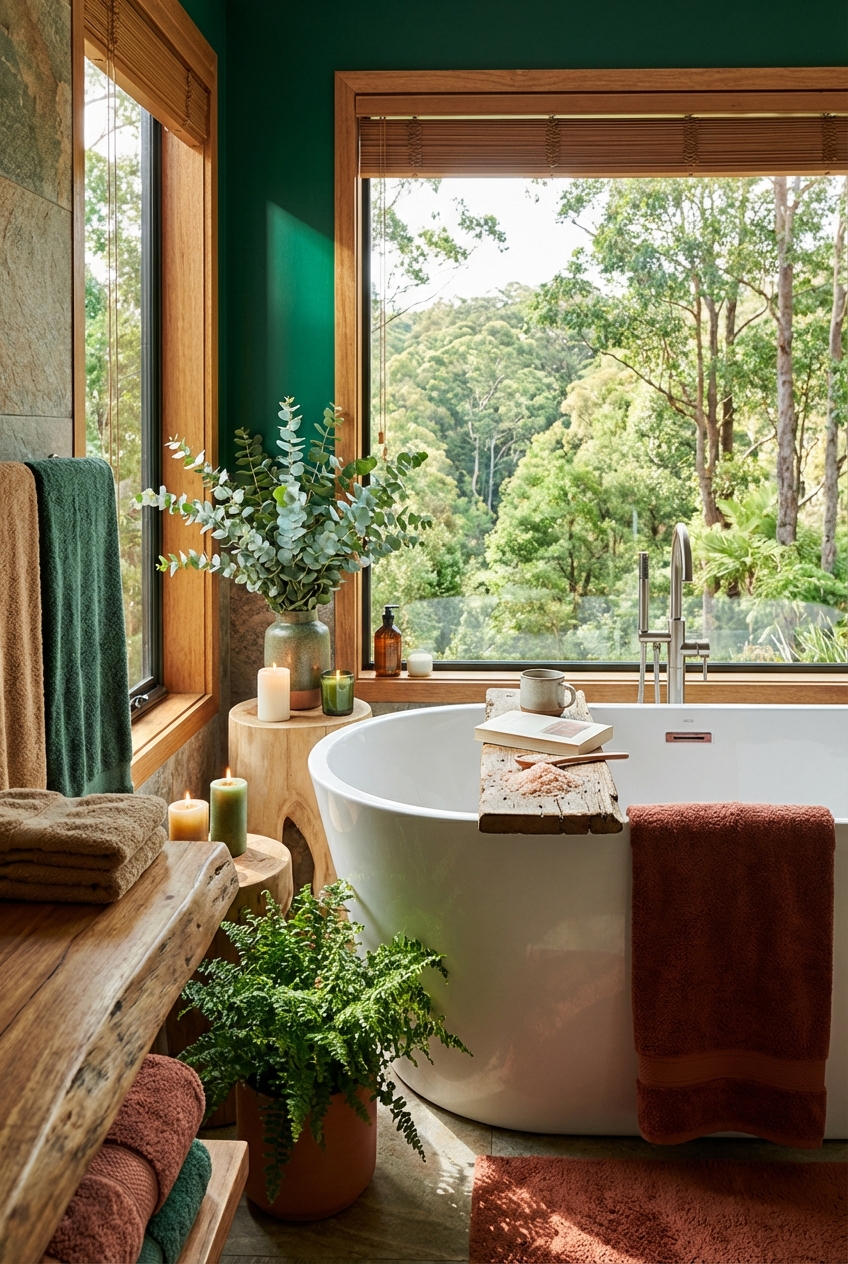
10) Picture Gallery


